mysql的主从热备份
Server version: 5.7.22-log
OS: master(windows10企业版20H2)-->slave(windows10企业版LTSC1809)
mysql的权限及必要点
1,任意ip可以连接2个数据库
-->>grant all on *.* to root@'%' identified by '[root密码]';
2,2个数据库的的库名,库中的结构要相同
-->>借助Navicat进行结构,数据同步
主库mysql的my.ini配置文件
log-bin=mysql.bin
# 使binlog在每N次binlog写入后与硬盘同步
sync-binlog=1
# 1天时间自动清理二进制日志
expire_logs_days=1
# 需要同步的数据库
binlog-do-db=master
binlog-do-db=*
# 不需要同步的数据库
binlog-ignore-db = information_schema
binlog-ignore-db = mysql
binlog-ignore-db = performance-schema
binlog-ignore-db = sys
# Error Logging.
log-error="WIN-11.1.1.197.err"
# Server Id
server-id=197
从库mysql的my.ini配置文件
# Server Id.
server-id=161
# bind-address=11.1.1.161
log_bin=mysql-bin
# 二进制日志自动删除的天数
expire_logs_days=1
主库mysql的配置
1,新建同步用户(back是mysql用户名,back123是密码,11.1.1.161是从库的IP地址)
-->>grant replication slave on *.* to 'back'@'11.1.1.161' identified by '[对应密码 ]';
2,刷新权限
-->>flush privileges;
3,添加测试数据库
create database test;
use test;
create table test(id int(11), value varchar(20));
insert into test values(1, 'aa'),(2, 'bb'),(3, 'cc') ,(4, 'dd') ,(5, 'ff')
4,查看master的状态(牢记File,Position)
-->>show master status \G

从库mysql的配置
1,新建同步用户并修改权限
-->>grant all privileges on *.* to 'back'@'%' identified by '[对应密码]' with grant option;
2,连接master主库
-->>change master to master_host='[主库IP]',master_user='同步用的user',master_password='对应passwd', master_log_file='[master status 中的file]',master_log_pos=[master status 中的Position];
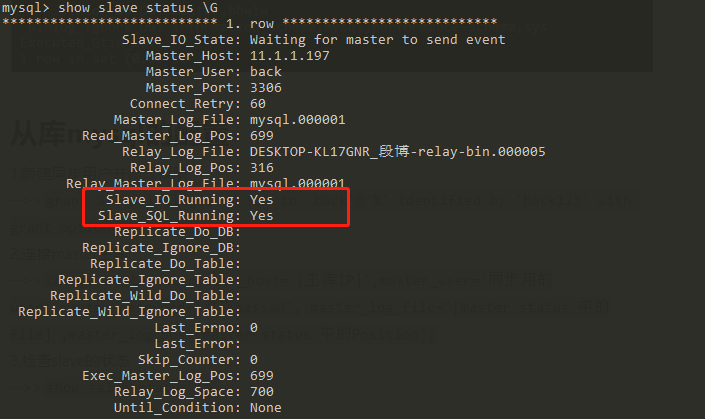
3,检查slave的状态
-->>show salve status \G
总结
slave IO和SQL状态都为'YES'则同步成功