requests模块
一. requests模块介绍
requests文档
https://requests.readthedocs.io/projects/cn/zh_CN/latest/
1. requests模块的作用
- 发送http请求,获取响应数据
2. 模块的使用
requests模块是一个第三方模块,需要在你的python(虚拟)环境中额外安装
pip install requests
3. 简单的get请求
- 需求:通过requests向百度首页发送请求,获取该页面的源码
- 运行下面的代码,观察打印输出的结果
# coding: utf8
"""
@File: part_001.py
@Author: Alice(From Chengdu.China)
@HomePage: https://github.com/AliceEngineerPro
@CreatedTime: 2022/10/17 2:25
"""

import os, sys

"""初识requests模块和简单的response对象"""

# 导入requests模块
import requests

# 目标url
url = 'https://www.baidu.com'
# 向目标url发送get请求
response = requests.get(url)
# 打印响应内容
print(response.text)
二. response响应对象
观察上边代码运行结果发现,有好多乱码;这是因为编解码使用的字符集不同早造成的;我们尝试使用下边的办法来解决中文乱码问题
# coding: utf8
"""
@File: part_001.py
@Author: Alice(From Chengdu.China)
@HomePage: https://github.com/AliceEngineerPro
@CreatedTime: 2022/10/17 2:25
"""

import os, sys

"""初识requests模块和简单的response对象"""

# 导入requests模块
import requests

# 目标url
url = 'https://www.baidu.com'
# 向目标url发送get请求
response = requests.get(url)
# 打印响应内容
# print(response.text)
print(response.content.decode())  # 注意这里
- response.text是requests模块按照chardet模块推测出的编码字符集进行解码的结果
- 网络传输的字符串都是bytes类型的, 所以response.text =
response.content.decode('推测出的编码字符集') - 我们可以在网页源码中搜索
charset,
尝试参考该编码字符集,注意存在不准确的情况
1. response.text和response.content的区别
- response.text
- type: str
- decode: requests模块自动根据HTTP
头部对响应的编码作出有根据的推测,推测的文本编码
- response.content
- type: bytes
- decode: None
2. 通过对response.content使用decode()方法, 来解决中文乱码

# coding: utf8
"""
@File: part_001.py
@Author: Alice(From Chengdu.China)
@HomePage: https://github.com/AliceEngineerPro
@CreatedTime: 2022/10/17 2:25
"""

import os, sys

"""初识requests模块和简单的response对象"""

import requests

url = 'https://baidu.com'
response = requests.get(url=url)
# print(response.text)
# print(response.content.decode('utf-8'))
print(response.content.decode())  # 默认是utf-8

- 常见的编码字符集
- utf-8
- gbk
- gb2312
- ascii
- iso-8859-1
3. response响应对象的其它常用属性或方法
response = requests.get(url)response是发送请求获取的响应对象
response响应对象中除了text、content获取响应内容以外还有其它常用的属性或方法
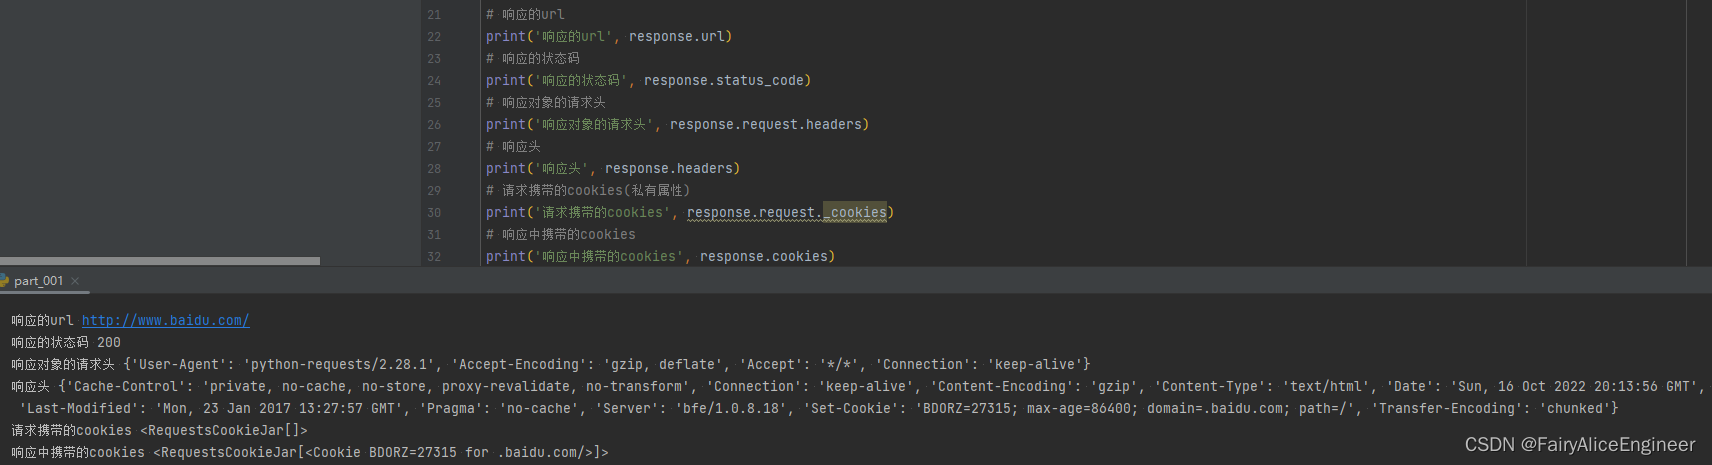
response.url响应的url, 有时候响应的url和请求的url并不一致response.status_code响应状态码response.request.headers响应对应的请求头response.headers响应头response.request._cookies响应对应请求的cookie, 返回RequestsCookieJar对象类型response.cookies响应的cookie, 经过了set-cookie动作, 返回RequestsCookieJar对象类型response.json自动将json字符串类型的响应内容转换为python对象 => dict or list
# coding: utf8
"""
@File: part_001.py
@Author: Alice(From Chengdu.China)
@HomePage: https://github.com/AliceEngineerPro
@CreatedTime: 2022/10/17 2:25
"""

import os, sys

"""初识requests模块和简单的response对象"""

import requests

url = 'https://baidu.com'
response = requests.get(url=url)
# print(response.text)
print(response.content.decode('utf-8'))
# 响应的url
print('响应的url', response.url)
# 响应的状态码
print('响应的状态码', response.status_code)
# 响应对象的请求头
print('响应对象的请求头', response.request.headers)
# 响应头
print('响应头', response.headers)
# 请求携带的cookies(私有属性)
print('请求携带的cookies', response.request._cookies)
# 响应中携带的cookies
print('响应中携带的cookies', response.cookies)
三. requests模块发送请求
1. 发送带header的请求
我们先写一个获取百度首页的代码
# coding: utf8
"""
@File: part_002.py
@Author: Alice(From Chengdu.China)
@HomePage: https://github.com/AliceEngineerPro
@CreatedTime: 2022/10/17 15:26
"""

import os, sys

"""requests发送请求"""

import requests

url = 'https://baidu.com'
response = requests.get(url=url)
# print(response.content.decode())
# 打印响应对应请求的请求头信息
print(response.request.headers)
返回的请求头

(1). 思考
-
对比浏览器上百度首页的网页源码和代码中的百度首页的源码, 有什么不同?
- 查看网页源码的方法:
右键->查看网页源代码
- 查看网页源码的方法:
-
代码中的百度首页的源码非常少, 为什么?
-
需要我们带上请求头信息
模拟浏览器,欺骗服务器,获取和浏览器一致的内容
-
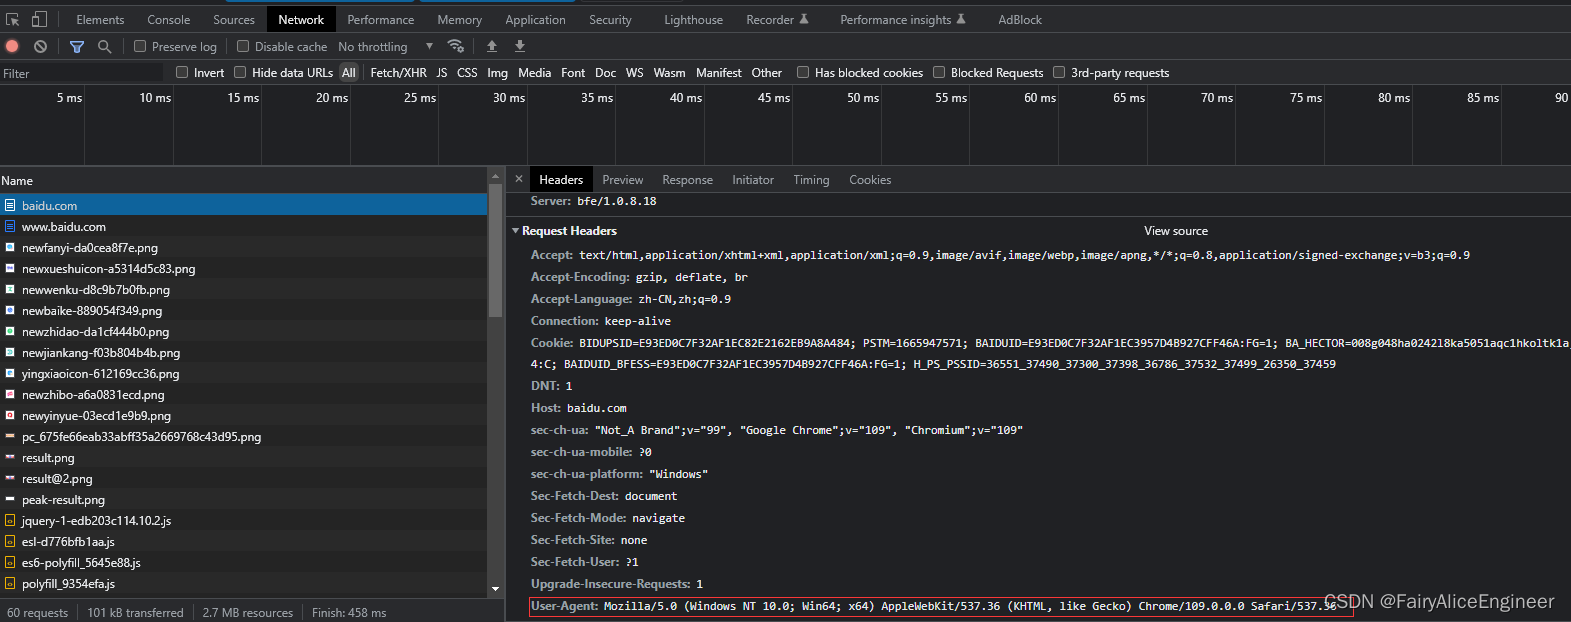
请求头中有很多字段,其中User-Agent字段必不可少,表示客户端的操作系统以及浏览器的信息
-
(2). 携带请求头发送请求的方法
requests.get(url=url, headers=headers)
- headers参数接收字典形式的请求头
- 请求头字段名作为key,字段对应的值作为value
(3). 完成代码实现
从浏览器中复制User-Agent,构造headers字典;完成下面的代码后,运行代码查看结果
# coding: utf8
"""
@File: part_002.py
@Author: Alice(From Chengdu.China)
@HomePage: https://github.com/AliceEngineerPro
@CreatedTime: 2022/10/17 15:26
"""

import os, sys

"""requests发送请求"""

import requests

url = 'https://baidu.com'
response = requests.get(url=url)
# print(response.content.decode())
# 打印响应对应请求的请求头信息
print(response.request.headers)

"""发送带headers的请求"""

# 定义请求头
headers = {
    'User-Agent': 'Mozilla/5.0 (Windows NT 10.0; Win64; x64) AppleWebKit/537.36 (KHTML, like Gecko) Chrome/109.0.0.0 Safari/537.36'
}

# 在请求头中带上User-Agent, 模拟浏览器发送请求
response = requests.get(url=url, headers=headers)
# 打印请求头
print(response.request.headers)

2. requests模块发送带参数的请求
我们在使用百度搜索的时候经常发现url地址中会有一个
?, 那么该问号后边的就是请求参数, 又叫做查询字符串
(1). 在url携带参数
直接对含有参数的url发起请求
# coding: utf8
"""
@File: part_002.py
@Author: Alice(From Chengdu.China)
@HomePage: https://github.com/AliceEngineerPro
@CreatedTime: 2022/10/17 15:26
"""

import os, sys

"""requests发送请求"""

import requests

url = 'https://baidu.com'
response = requests.get(url=url)
# print(response.content.decode())
# 打印响应对应请求的请求头信息
print(response.request.headers)
print(f'没有自定义headers返回的响应头大小: {len(response.content.decode())}')

"""发送带headers的请求"""

# 定义请求头
headers = {
    'User-Agent': 'Mozilla/5.0 (Windows NT 10.0; Win64; x64) AppleWebKit/537.36 (KHTML, like Gecko) Chrome/109.0.0.0 Safari/537.36'
}

# 在请求头中带上User-Agent, 模拟浏览器发送请求
response = requests.get(url=url, headers=headers)
# 打印请求头
print(response.request.headers)
print(f'自定义headers返回的响应头大小: {len(response.content.decode())}')

"""发送带参数的请求"""

url = 'https://baidu.com/s?wd=python'
response = requests.get(url=url, headers=headers)
(2). 通过params携带参数字典
- 构建请求参数字典
- 向接口发送请求的时候带上参数字典,参数字典设置给params
# coding: utf8
"""
@File: part_002.py
@Author: Alice(From Chengdu.China)
@HomePage: https://github.com/AliceEngineerPro
@CreatedTime: 2022/10/17 15:26
"""

import os, sys

"""requests发送请求"""

import requests

url = 'https://baidu.com'
response = requests.get(url=url)
# print(response.content.decode())
# 打印响应对应请求的请求头信息
print(response.request.headers)
print(f'没有自定义headers返回的响应头大小: {len(response.content.decode())}')

"""发送带headers的请求"""

# 定义请求头
headers = {
    'User-Agent': 'Mozilla/5.0 (Windows NT 10.0; Win64; x64) AppleWebKit/537.36 (KHTML, like Gecko) Chrome/109.0.0.0 Safari/537.36'
}

# 在请求头中带上User-Agent, 模拟浏览器发送请求
response = requests.get(url=url, headers=headers)
# 打印请求头
print(response.request.headers)
print(f'自定义headers返回的响应头大小: {len(response.content.decode())}')

"""发送带参数的请求"""

url = 'https://baidu.com/s'
# url = 'https://baidu.com/s?wd=python'
# response = requests.get(url=url, headers=headers)

# 请求参数是一个字典 即wd=python
params = {
    'wd': 'python'
}
# 带上请求参数发起请求,获取响应
response = requests.get(url=url, headers=headers, params=params)
3. 在headers参数中携带cookie
网站经常利用请求头中的Cookie字段来做用户访问状态的保持, 那么我们可以在headers参数中添加Cookie, 模拟普通用户的请求, 我以github登陆为例
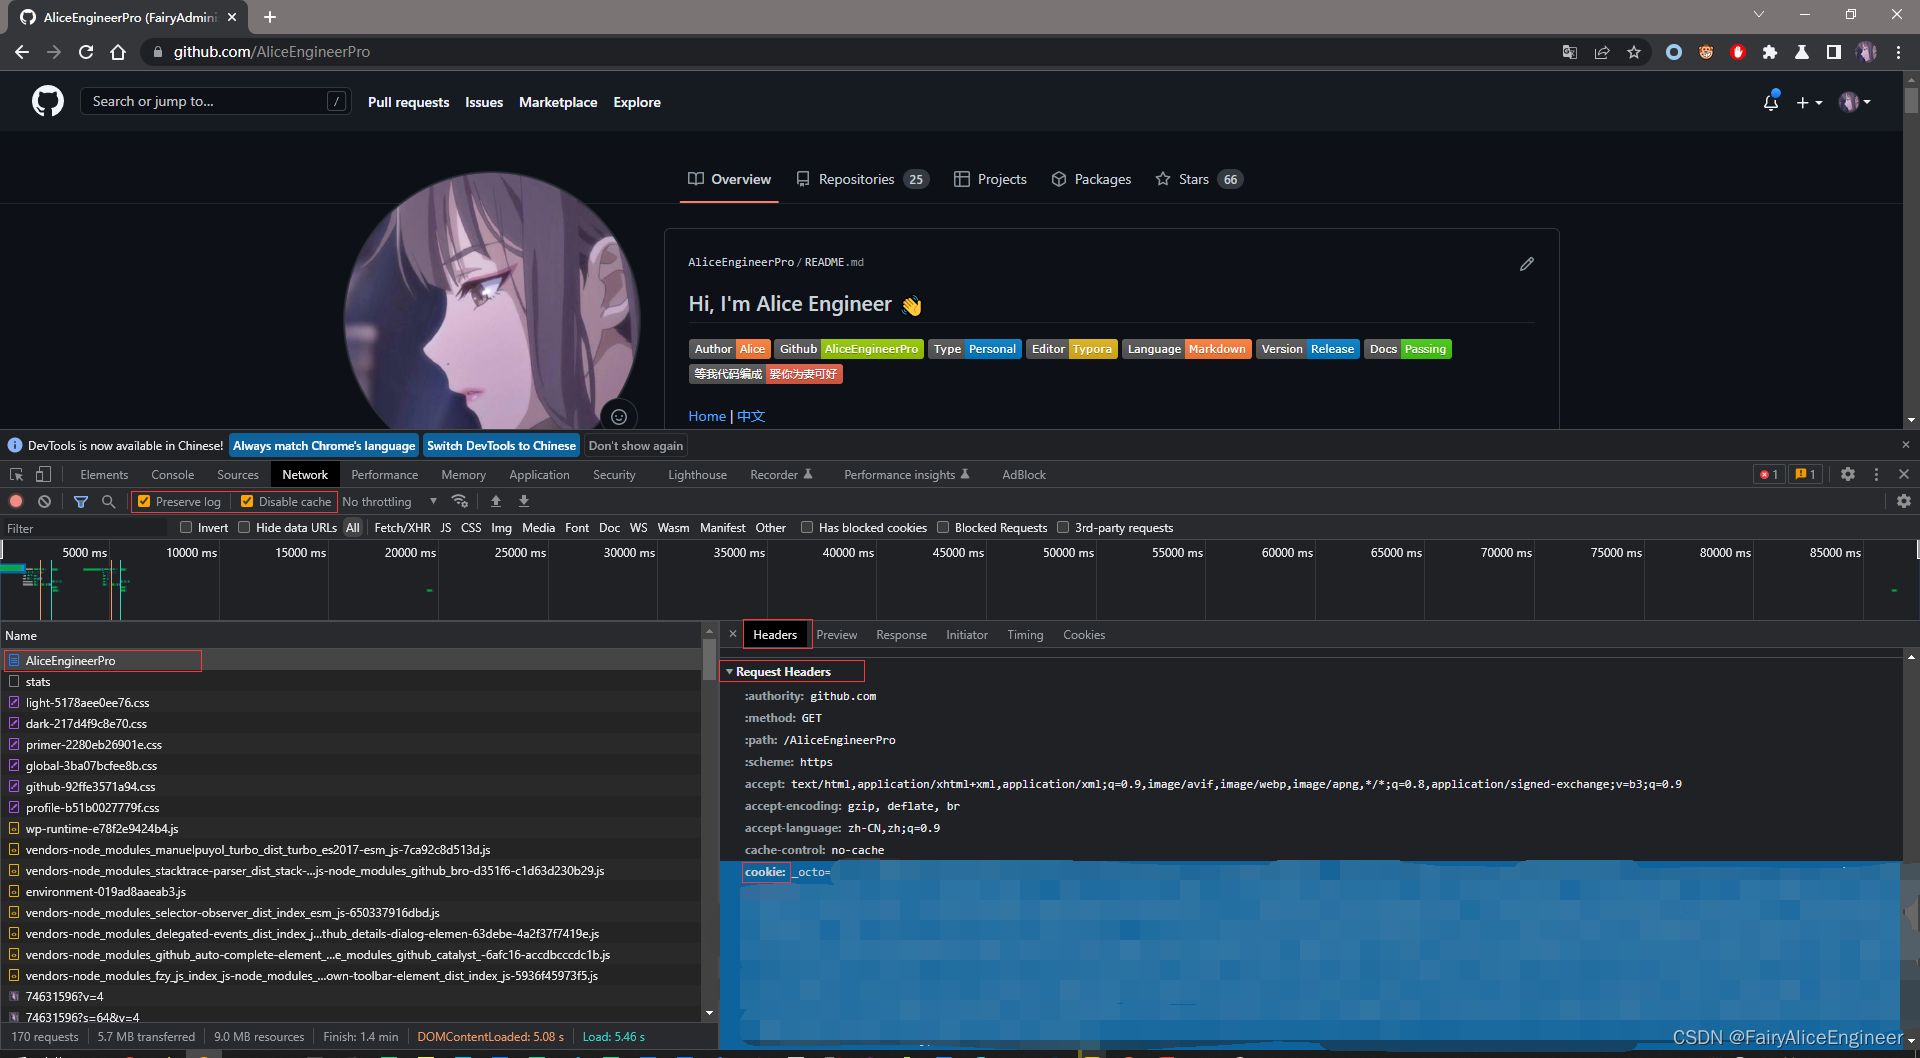
(1). github登陆抓包分析
- 打开浏览器,
右键->检查, 点击Network, 勾选Preserve log - 访问github登陆的url地址 https://github.com/login
- 输入账号密码点击登陆后, 访问一个需要登陆后才能获取正确内容的url; 访问 https://github.com/{USERNAME}
- 确定url之后, 再确定发送该请求所需要的请求头信息中的
User-Agent和Cookie
(2). 代码完成
- 从浏览器中复制
User-Agent和Cookie - 浏览器中的请求头字段和值与headers参数中必须一致
- headers请求参数字典中的Cookie键对应的值是字符串
# coding: utf8
"""
@File: part_003.py
@Author: Alice(From Chengdu.China)
@HomePage: https://github.com/AliceEngineerPro
@CreatedTime: 2022/10/17 16:10
"""

import os, sys

"""在headers参数中携带cookie"""

"""github示例"""

import requests

url = 'https://github.com/AliceEngineerPro'
# url = 'https://github.com/{USERNAME}'

# 构造请求头字典
headers = {
    # 从浏览器中复制过来的User-Agent
    'User-Agent': 'Mozilla/5.0 (Windows NT 10.0; Win64; x64) AppleWebKit/537.36 (KHTML, like Gecko) Chrome/109.0.0.0 Safari/537.36',
    # 从浏览器中复制过来的Cookie
    'Cookie': 'cookie字符串'
}

# 请求头参数字典中携带cookie字符串
response = requests.get(url, headers=headers, proxies={'http': 'http://127.0.0.1:56789'})
print(response.content.decode())
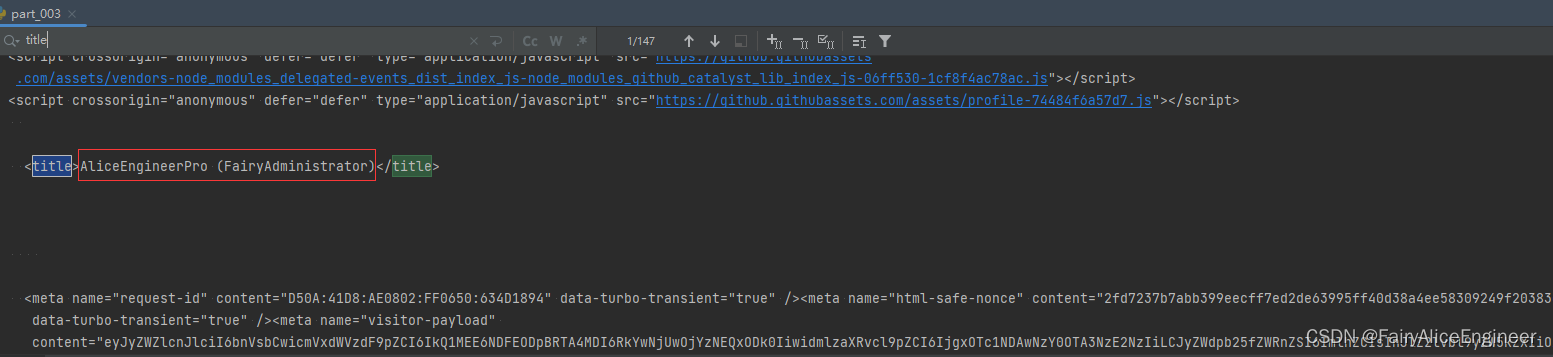
(3). 运行代码验证结果
在打印的输出结果中搜索title, html中的标题文本内容如果是你的github账号, 则成功利用headers参数携带cookie, 获取登陆后才能访问的页面